Procedural generation in Catacombs 51, my Ludum Dare 51 game
Back in September I participated in the 51st Ludum Dare Compo, a 48-hour game jam. The theme for that event was “every ten seconds” - and I ended up creating Catacombs 51, a 2D roguelikeish shooter thing with procedurally generated maps. And now, ten months later, here is a write-up on how that procedural generation works. Partially as it’s a decently cool aspect of the game that I think it’s worth sharing, and partially because I’m doing other 2D procedural level generation stuff right now and wanted to give myself a refresher.
If you want to look at the actual code behind this, the game’s source is available on GitHub and all the generation code is in the well-named scr_mapgen.gml. For the screenshots in this post I modified stuff a bit, the changes are in the mapgen-article branch. It looks pretty ugly in the screenshots, but the actual game is prettier, I promise. It’s moody!
Pieces
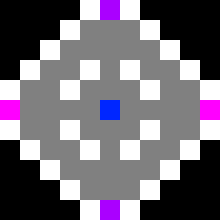
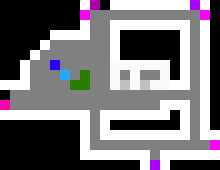
The world generator creates maps using pre-set pieces. Each piece is simply a bitmap image, with specific colours representing specific tiles. The pieces are bitmaps because this makes editing them easy: I can just use any image editor (my usual is Paint.NET). Unfortunately, GameMaker’s HTML5 export, is unable to read binary files, so I wrote a basic Python script to convert the bitmaps to text files, which can be read in HTML5.

|
|
|
| player | spawn1 | arena4 |
| nothing | 000000 |
| wall | FFFFFF |
| jail bars | C0C0C0 |
| jail bars (horizontal) | C1C1C1 |
| toilet (facing down) | C2C2C2 |
| toilet (facing up) | C3C3C3 |
| bed (facing down) | C4C4C4 |
| bed (facing up) | C5C5C5 |
| floor | 808080 |
| piece connection, 1-high | FF00FF |
| piece connection, 2-high | FF00AA |
| piece connection, 1-wide | AA00FF |
| piece connection, 2-wide | AA00AA |
| player spawn | 0026FF |
| item spawn | 2200FF |
| big zombie | 22AAFF |
| decor | 267F00 |
A bit of pre-processing
When the game starts, all of the pieces are loaded into memory and stay there throughout the lifetime of the game. It’s only a handful of tiny images, so no worry about resource usage.
After each piece is loaded, a little bit of processing happens: for each possible pixel type there is a list of each piece containing that pixel, and the piece is added to the respective lists if it hasn’t been already. The location of every piece connector in the piece is also stored.
Blitting
Throughout the generation process, the level is stored in an internal grid of tiles, separate to the actual tilemap that is eventually produced. Placing tiles from pieces into this grid is done by the blit function. This function replaces any tiles in the internal grid with that of a given piece, starting at the given coordinates. Any piece connectors that are placed by the blit function also get added to a queue.
There’s also an additional function canBlit which checks if any tiles would overlap when blitted. This is used to ensure a piece won’t be placed atop existing terrain.
The actual generation
1. Spawn

The first bit is very simple: pick a random spawn piece and plop it right in the middle of the map.
2. Resolve Connections
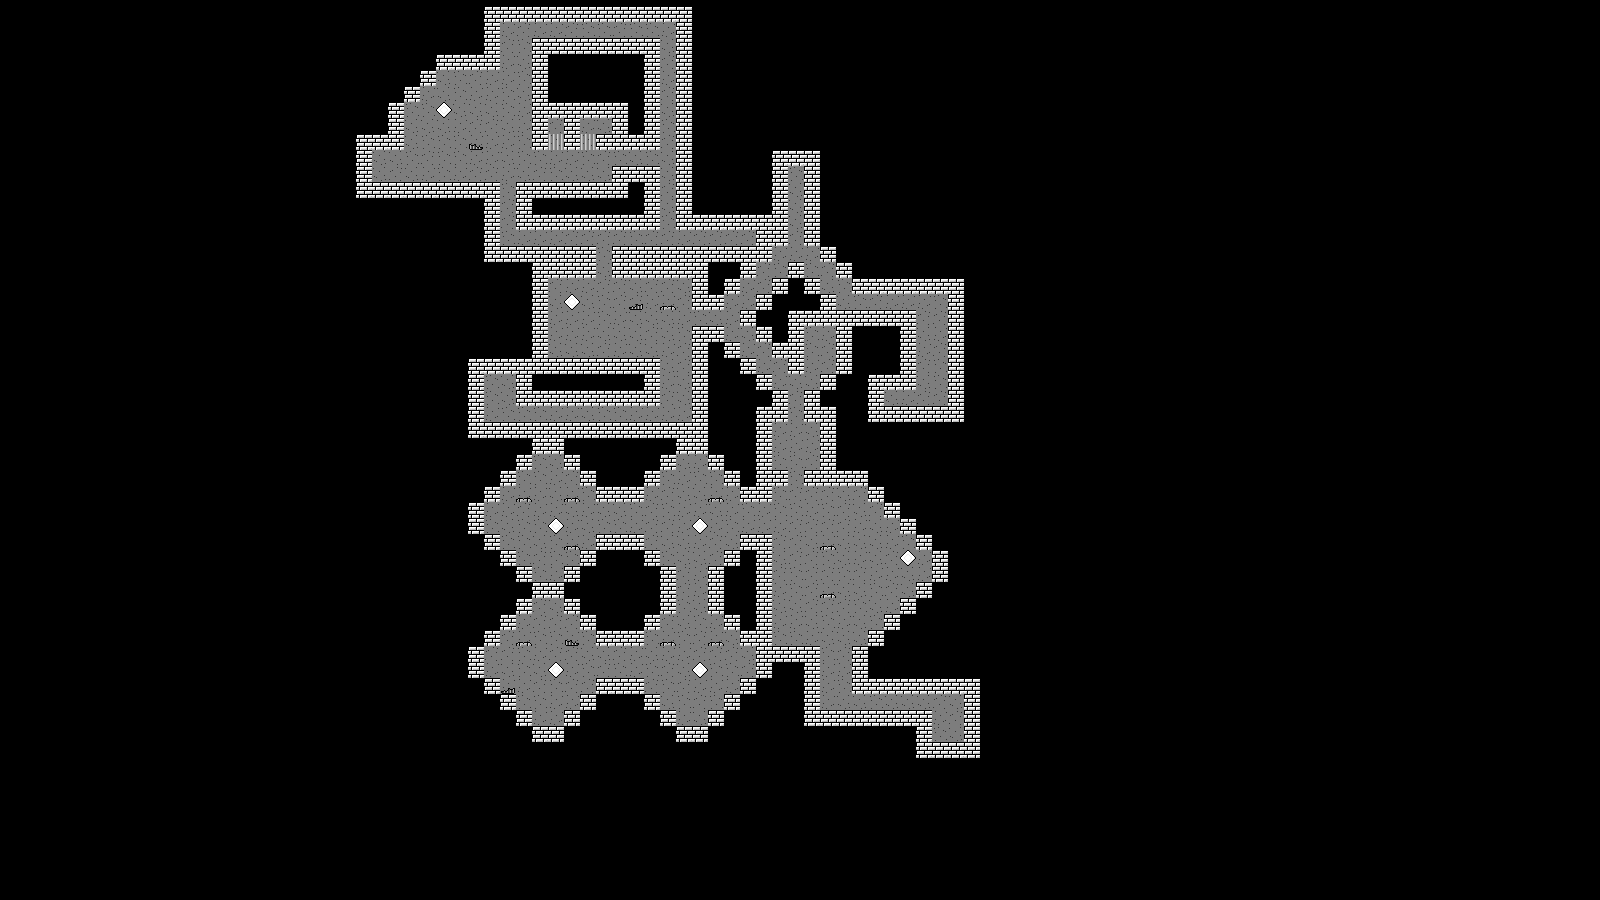
The second part is not so simple. Remember how the blit function adds all connectors to a queue? This step runs for as long as that queue has something in it. For each connector in the queue, it tests every other non-spawn piece that has the same connector in a random order, and sees if there are any configurations in which that piece can be connected to the current connector without overlapping. If so, it blits that piece in, and replaces the connector pieces with floor tiles. Remember, the blit function adds new connectors to the queue, so this step will continue to run. It eventually ends once there’s no more connectors, or there’s no more space in the map to fit any more pieces - the map is only 64x64 tiles large. This is effectively a bruce-force method of making a level, and probably isn’t very efficient.
In the first version of the game, this step would only consider a single piece to connect to another. This resulted in a lot of empty levels when that piece wouldn’t fit, so I reworked it to consider every piece.
3. Seal Holes

You probably noticed that step 2 left some holes where other pieces could connect. For this step it simply checks every connector piece and replaces it with a wall tile. It also checks each empty tile and replace those with walls if they have any floor tiles adjacent.
4. Random Replace
This step simply randomly replaces decorative tiles with floor tiles. Jail bars have a 1/5 chance of being replaced, decorative objects have a 1/2 chance, beds and toilets have a 1/3 chance. This makes the level detailing a bit less visually repetitive.
6. Place Tiles
This step turns that internal grid into actual game state! Floors and walls are turned into a tile map, while decorative tiles are turned into floors in the tilemap with an object on top. Other special tiles also get turned into floors and their locations saved for later use. Tiles that were always floors in the internal grid have a chance to be flipped and/or mirrored. There’s no image to demonstrate this one, as I’ve needed it to have something to show you in every other step!
7. Place Items

The item tiles that were identified in step 6 now get items placed on top of them.
For each item tile, a weapon will attempt to spawn if one hasn’t yet. The weapon that is spawned depends on the weapons the player currently owns and the level the player is on. If a player does not own a weapon and the level number is at least that specified, that weapon will spawn, with this being checked in the order shown in the table below:
| Weapon | Level |
|---|---|
| Rifle | 0 |
| Shotgun | 3 |
| Chaingun | 5 |
| Rocket launcher | 11 |
For all other items, it just chooses a random powerup to spawn.
8. Place Zombies
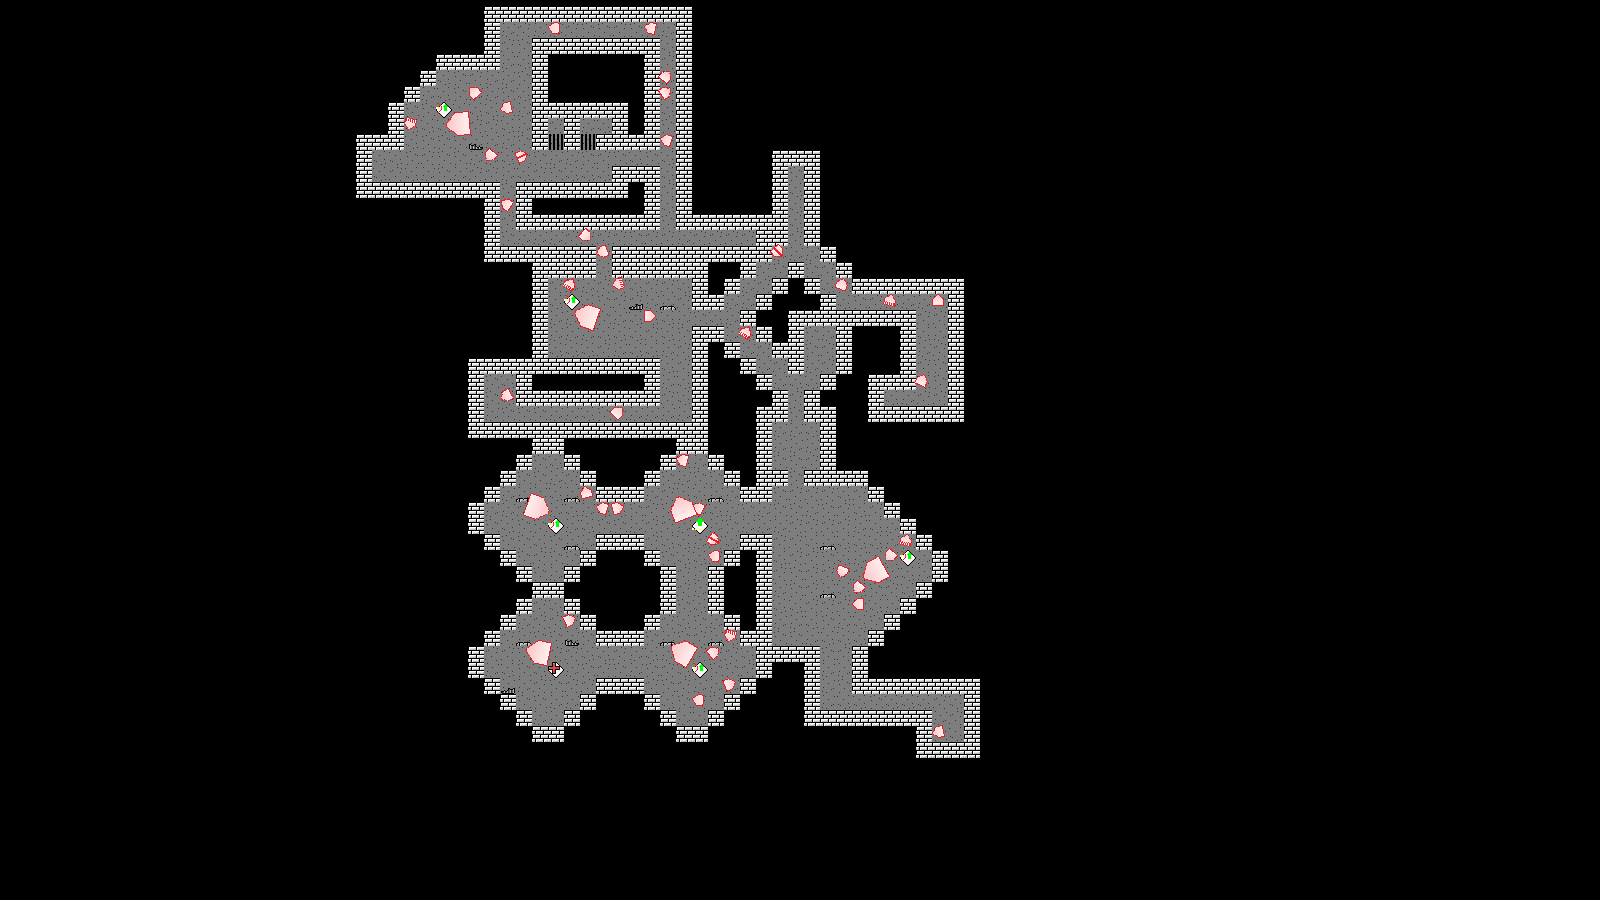
To spawn zombies, it once again considers every single tile of the internal grid. If the tile was once a “big zombie” tile, a big zombie is spawned there with no further consideration. The remaining spawn code will then check:
- if the tile was always a floor tile
- if the tile is greater than 7 tiles away from the centre of the map (the player spawn)
- if a random number between 0-10 includes is less than the greater of 1 or the current level number divided by 4
If any of these fail, a zombie will not be spawned. Otherwise, there is a 1/16 chance a gun zombie will spawn, a 3/16 chance a fast zombie will spawn, and any other result spawns a normal zombie.
For gun zombies, there is a 1/6 chance each for it to spawn with a rifle, shotgun, or chaingun, so long as the current level is at least that needed to spawn it: rifle zombies spawn starting at level 5, shotgun zombies at level 10, and chaingun zombies at level 12.
Every zombie (including big zombies) is given a random rotation after being spawned.
And after all of that, we have a level. This is actually a fairly simple method for generating levels everything considered, but it worked well enough for this game, I think. It was certainly fun programming it and seeing it actually work.
There was one removed step: opening walls, which sat between resolving connections and sealing holes.

This allowed creating bigger arenas out of conjoined pieces. I forgot why I removed it, but there was probably good reason…